Connect your Cursor IDE to Capsule Security for complete visibility into AI coding assistant activity, including prompts, responses, shell commands, and MCP tool usage.
This integration uses Cursor's hooks system to capture AI coding assistant activity.
The following hooks are configured:
| Hook | Description |
|---|---|
| beforeSubmitPrompt | User prompts before submission to the AI |
| afterAgentResponse | AI assistant responses |
| afterAgentThought | Agent reasoning and thought processes |
| afterShellExecution | Shell commands and their output |
| afterMCPExecution | MCP tool calls and results |
Before you begin, ensure you have:
- Cursor IDE installed (version 0.40 or later recommended)
- A Capsule Security account with admin access
Contact the Capsule Security support team to receive a hooks.json configuration file customized for your organization.
Enterprise teams can leverage Cursor's native cloud distribution system to automatically synchronize hooks across their organization.
Key Features:
- Centralized management through the Cursor web dashboard
- Automatic synchronization to all team members (every 30 minutes)
- Operating system targeting for platform-specific hooks
- No manual deployment to individual machines required
Setup:
- Access the Cursor web dashboard
- Navigate to the team content section under Hooks
- Upload or configure the hooks provided by Capsule Security
- The platform automatically delivers configurations to all authenticated team members
For organizations using Mobile Device Management (MDM) tools, deploy hooks to the following system-wide locations:
| Platform | Path |
|---|---|
| macOS | /Library/Application Support/Cursor/hooks.json |
| Linux/WSL | /etc/cursor/hooks.json |
| Windows | C:\ProgramData\Cursor\hooks.json |
Key Considerations:
- MDM-based distribution is fully managed by your organization
- Your internal IT or security team is responsible for configuration, deployment, and updates
- Leverage your existing MDM infrastructure while maintaining control over hook distribution
For organizations using Kandji MDM, deploy the hooks configuration using a Custom App.
Setup Steps:
- Log in to your Kandji tenant
- Navigate to Library > Custom Apps
- Click Add New and select Custom App
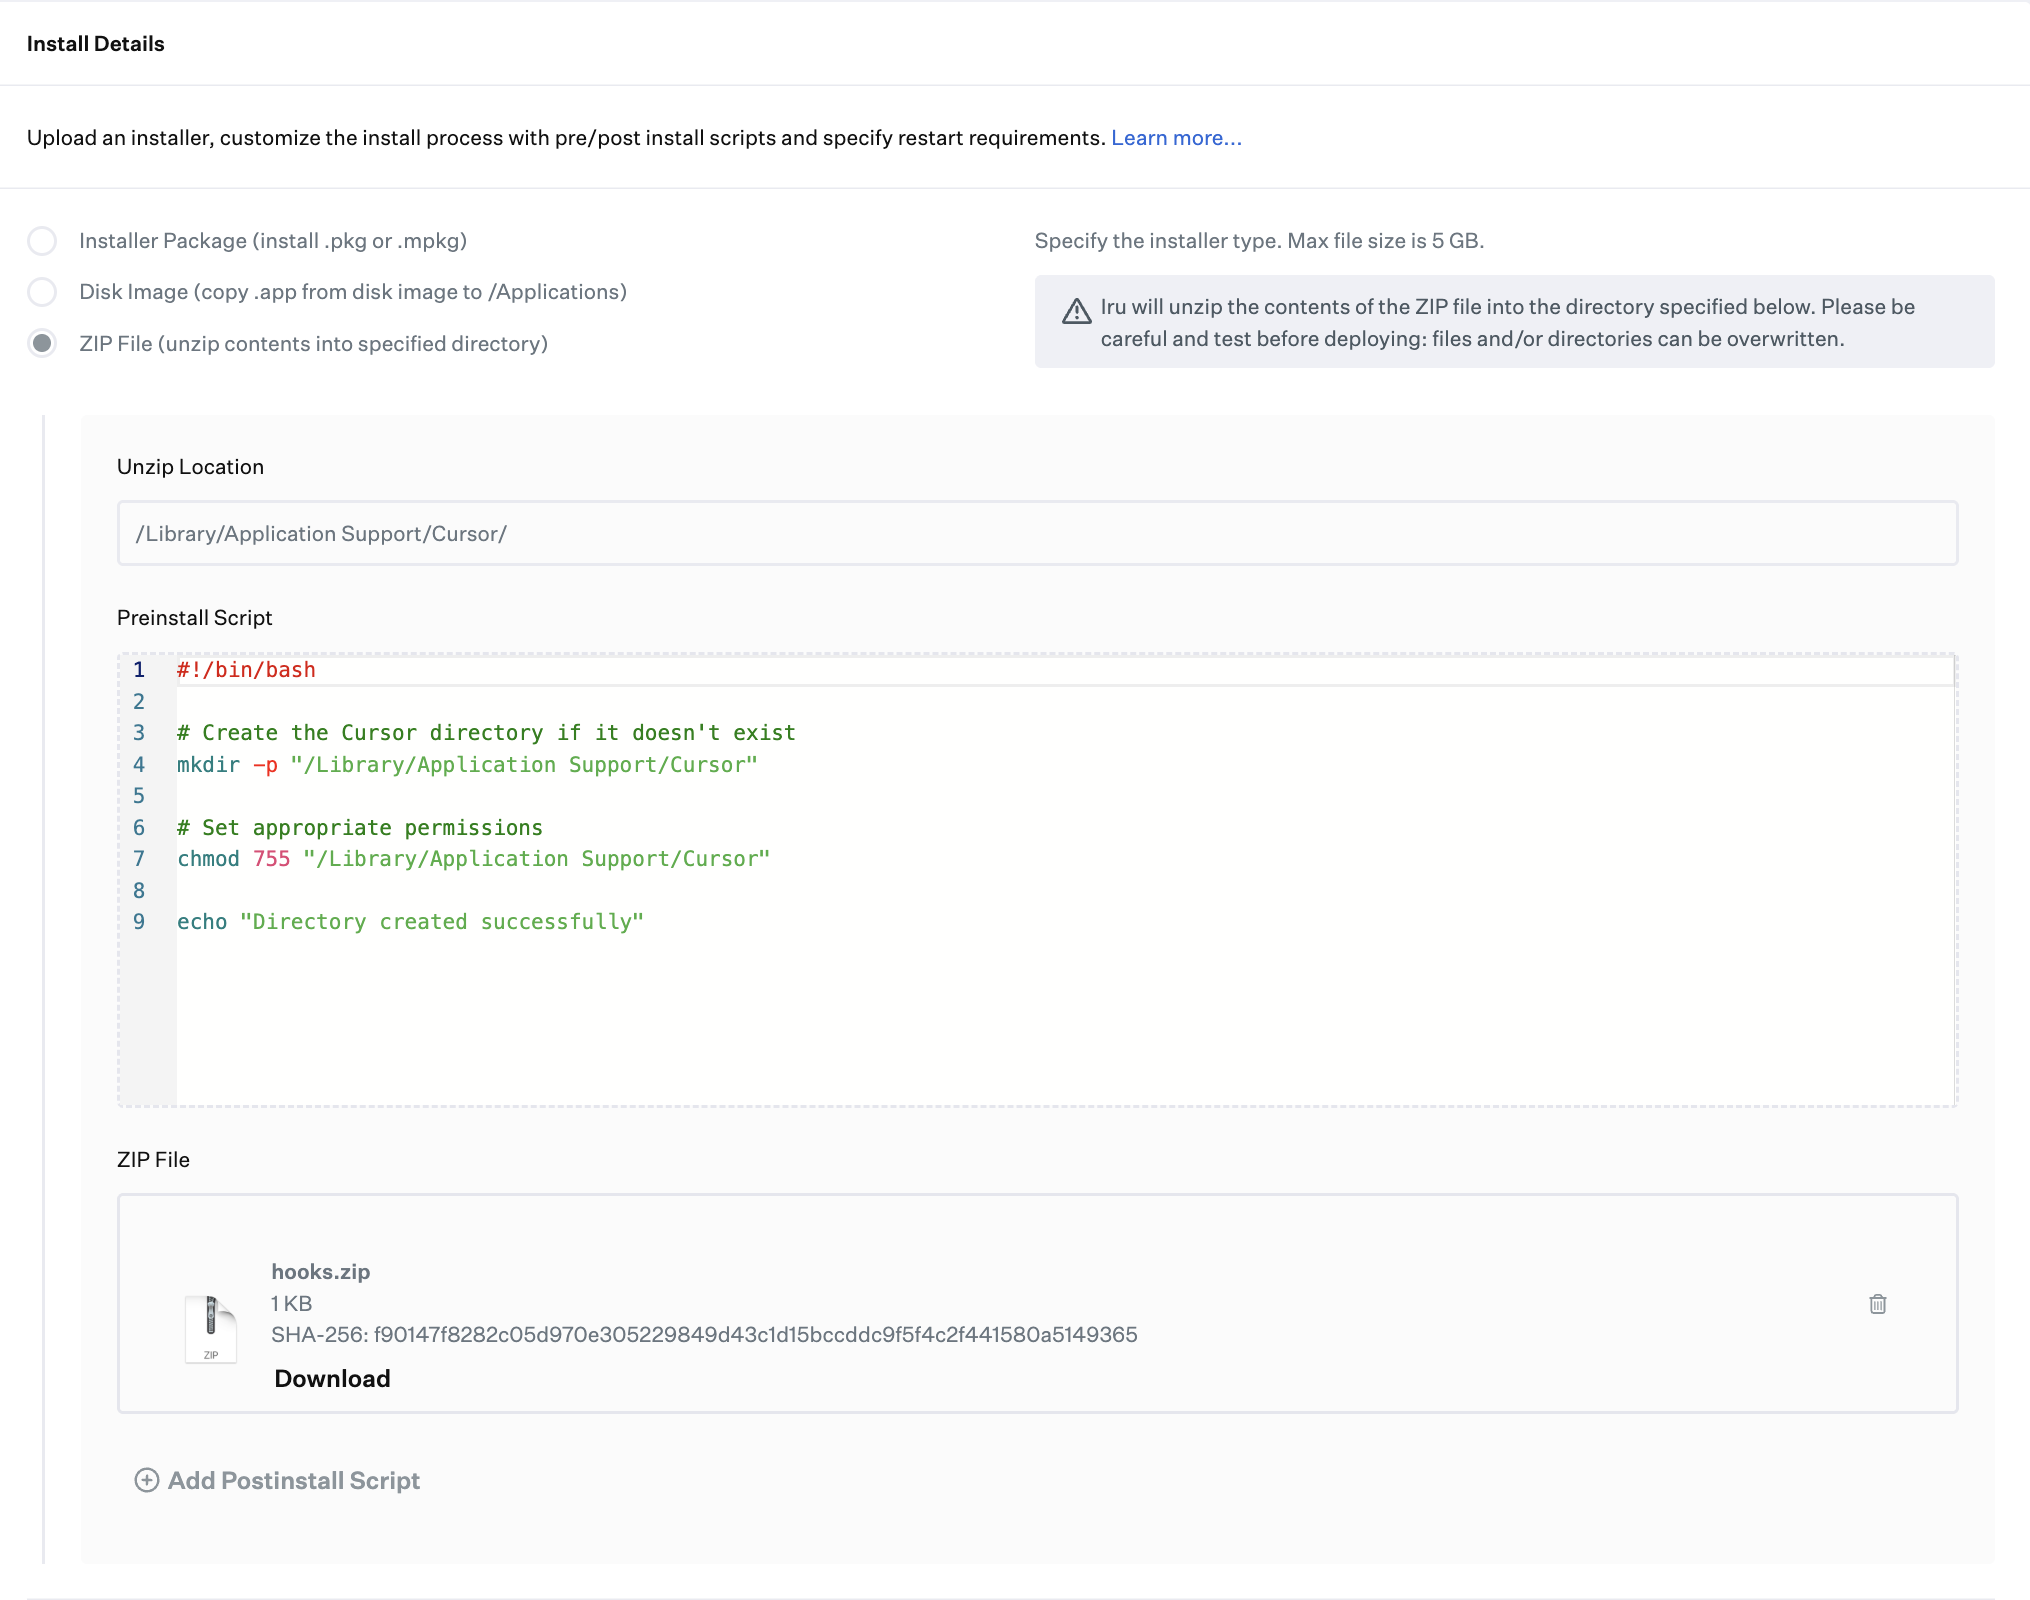
- Configure the installation:
- Name: Capsule Security Cursor Hooks
- Install Type: Select ZIP File (unzip contents into specified directory)
- Unzip Location:
/Library/Application Support/Cursor/
- Configure the Preinstall Script:
#!/bin/bash # Create the Cursor directory if it doesn't exist mkdir -p "/Library/Application Support/Cursor" # Set appropriate permissions chmod 755 "/Library/Application Support/Cursor" echo "Directory created successfully" - Download the hooks.json file from the Capsule Security portal:
- Navigate to Settings > Integrations
- Locate the Cursor integration
- Download the
hooks.jsonfile
- Create a ZIP archive containing the
hooks.jsonfile:zip hooks.zip hooks.json - Upload the hooks.zip file to the Custom App
- Assign the Custom App to the appropriate devices or Smart Groups
- Deploy the configuration
Key Considerations:
- The preinstall script ensures the target directory exists with proper permissions
- The ZIP file will be extracted directly into
/Library/Application Support/Cursor/ - Restart Cursor on target devices after deployment
- Updates can be deployed by modifying the Custom App and incrementing the version
For organizations using Jamf Pro, deploy the hooks configuration using Jamf Composer to create a package with a preinstall script.
Setup Steps:
Download the hooks.json file from the Capsule Security portal:
- Navigate to Settings > Integrations
- Locate the Cursor integration
- Download the
hooks.jsonfile
Open Jamf Composer on your Mac
Create a new package source by dragging:
- Open Finder and create the directory structure locally:
/Library/Application Support/Cursor/ - Place the
hooks.jsonfile inside this directory - Important: Composer captures the exact file structure, so the
hooks.jsonfile must already be in/Library/Application Support/Cursor/before dragging into Composer - Drag only the
Cursorfolder directly into Composer's Sources panel on the left sidebar - A new package source will be created automatically with the correct directory structure
- Open Finder and create the directory structure locally:
Configure the package destination:
- In the left sidebar, right-click on the newly created package source
- Select Edit Package or Package Settings
- Verify the installation location:
- Confirm the destination is set to
/(root) so files install to/Library/Application Support/Cursor/ - Verify the
hooks.jsonfile is mapped to be installed in the correct location
- Confirm the destination is set to
Add a Preinstall Script:
- Expand the Package under Sources
- Right-click on Scripts and select Add Shell Script > preinstall
- Paste the following script:
#!/bin/bash

# Create the Cursor directory if it doesn't exist
mkdir -p "/Library/Application Support/Cursor"

# Set appropriate permissions
chmod 755 "/Library/Application Support/Cursor"

echo "Directory created successfully"
exit 0
Build the package:
- Click Build as PKG
- Save the package with a descriptive name (e.g.,
CapsuleCursorHooks.pkg)
Upload the package to Jamf Pro:
- Log in to your Jamf Pro console
- Navigate to Settings > Computer Management > Packages
- Click New and upload the
.pkgfile - Configure display name and category
Create a Policy to deploy the package:
- Navigate to Computers > Policies
- Click New
- Configure the policy:
- Name: Deploy Capsule Security Cursor Hooks
- Trigger: Recurring Check-in (or your preferred trigger)
- Execution Frequency: Once per computer
- Under Packages, click Configure and add your package
- Set Action to Install
Configure the Scope:
- Click the Scope tab
- Add target computers, computer groups, or departments
Save and deploy the policy
Key Considerations:
- The preinstall script ensures the target directory exists with proper permissions before file deployment
- Packages must be in
.pkgformat to support preinstall scripts - To update the configuration, create a new package version and update the policy
- Consider using Smart Groups for dynamic targeting and rollout
For organizations using Microsoft System Center Configuration Manager (SCCM), deploy the hooks configuration as an SCCM Application with a script installer.
Setup Steps:
Download the hooks.json file from the Capsule Security portal:
- Navigate to Settings > Integrations
- Locate the Cursor integration
- Download the
hooks.jsonfile
Place the
hooks.jsonfile on a network share accessible by your SCCM distribution points:\\sccm-server\sources\Software\CapsuleCursorHooks\hooks.jsonOpen the SCCM Console and navigate to Software Library > Application Management > Applications
Click Create Application and select Manually specify the application information:
- Name: Capsule Security Cursor Hooks
- Publisher: Capsule Security
- Description: Deploys Cursor hooks configuration for Capsule Security monitoring
Add a Deployment Type with Script Installer:
Content location:
\\sccm-server\sources\Software\CapsuleCursorHooks\Install command:
cmd.exe /c mkdir "C:\ProgramData\Cursor" & copy /Y "hooks.json" "C:\ProgramData\Cursor\hooks.json"Uninstall command:
cmd.exe /c del "C:\ProgramData\Cursor\hooks.json"
Configure the Detection Method:
Setting Value Type File Path C:\ProgramData\CursorFile name hooks.jsonProperty File or folder exists Configure User Experience settings:
Setting Value Installation behavior Install for system Logon requirement Whether or not a user is logged on Installation program visibility Hidden Maximum allowed run time 5 minutes Distribute Content:
- Right-click the application and select Distribute Content
- Select your distribution point groups
- Complete the wizard
Create a Deployment:
- Right-click the application and select Deploy
- Choose the target Device Collection
- Configure:
Setting Value Action Install Purpose Required Schedule As soon as possible (or a maintenance window)
Key Considerations:
- The hooks file is deployed to the system-wide path
C:\ProgramData\Cursor\so it applies to all users on the machine - Since this is a system-level deployment, target Device Collections rather than User Collections
- To update the configuration, replace the
hooks.jsonfile on the network share and create a new deployment or use SCCM's content update and redeployment workflow - Restart Cursor on target devices after deployment for the hooks to take effect
- Consider using SCCM Maintenance Windows to control when deployments occur
After placing the configuration file, restart Cursor to activate the hooks.
Close all Cursor windows
Reopen Cursor
Verify the hooks are active:
- Open Cursor Settings
- Navigate to the Hooks tab
- Confirm the hooks are listed and enabled
Test that events are being captured in Capsule.
Open a project in Cursor
Use the AI assistant (Cmd+K or Agent Chat) to execute a task
Log in to the Capsule Security portal
Navigate to Inventory > Agents and confirm your agent is displayed.
Click on your agent and review the audit logs to verify events are being captured.
To view the full conversation, navigate to Observability → Filter Activity Type - Session
If events are not appearing, please contact the Capsule Security support team for assistance.
For help with this integration:
- Email: support@capsule.security
- Include: Your organization ID, integration status, and any error messages